Настройки проекта
Окно «Настройки проекта» используется для настройки используемого оборудования и программного обеспечения:
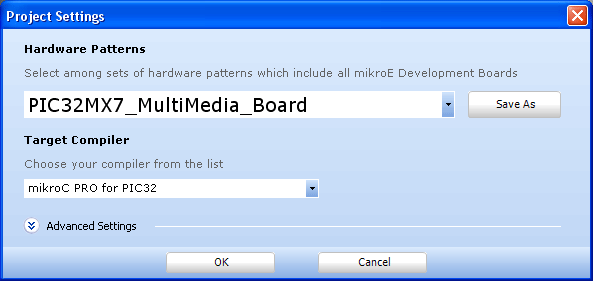
Когда он будет открыт, он будет состоять в основном из двух частей:
Для того чтобы показать дополнительные настройки, пожалуйста, нажмите на значок ![]() .
.
 Аппаратные паттерны
Этот раскрывающийся список позволит вам выбрать аппаратный шаблон, предопределенный или новый пользовательский шаблон.
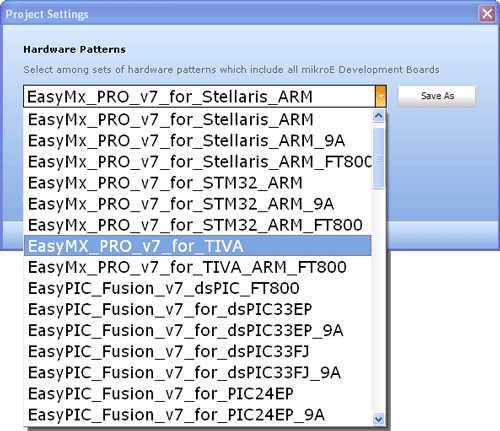
При выборе одного из предопределенных шаблонов оборудования - систем разработки из раскрывающегося списка, все параметры будут установлены автоматически.
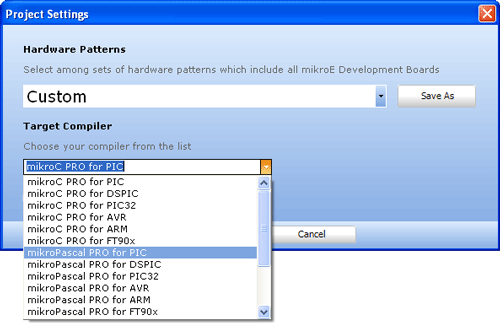
Кроме того, вы можете создать собственный аппаратный паттерн, выбрав опцию Custom из выпадающего списка. Затем вы устанавливаете пользовательскую конфигурацию, нажимаете кнопку Save As.., и выпадающий список будет заполнен этим шаблоном.
Целевой компилятор
Выберите нужный компилятор для вашей системы разработки:
По умолчанию Visual TFT выберет целевой компилятор, если выбрана система разработки.
Из-за особенностей архитектуры, инициализация контроллеров TFT может отличаться от компилятора к компилятору.
Пожалуйста, ознакомьтесь с порядком инициализации режима работы 8-битного TFT-контроллера и 16-битного TFT-контроллера.
Расширенные настройки
В дополнительных настройках доступны четыре вкладки:
General
Вкладка General разделена на три основные части: Device Settings (Настройки устройства), Display Settings (Настройки дисплея) и Touch Panel Controller Type (Тип контроллера сенсорной панели):
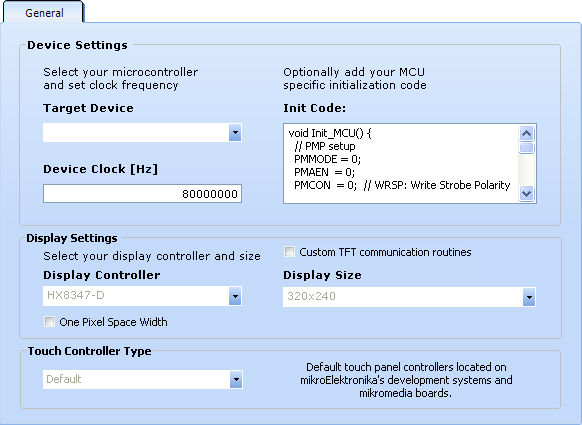
Device Settings
В настройках устройства Device Settings пользователь может выбрать целевое устройство Target Device MCU, ввести соответствующие часы устройства Device Clock и при необходимости добавить код инициализации устройства Init Code.
 Примечание Примечание |
|---|
|
Будьте осторожны при выборе целевого устройства, так как сгенерированный код может превысить ограничения памяти. |
Display Settings
В настройках дисплея Display Settingsпользователь может выбрать нужный контроллер дисплея Display Controller и размер дисплея Display Size.
Visual TFT поддерживает следующие контроллеры TFT:
- Himax HX8347G, HX8347D, HX8352A,
- Solomon Systech SSD1963,
- Renesas SP R61526,
- Sitronix SST7715R,
- Ilitek ILI9340, ILI9341, ILI9342 and ILI9481,
- FTDI FT800, FT801, FT810, FT811, FT812 and FT813
- TIVA
Для получения дополнительной информации см. Режим работы 8-битного контроллера TFT, режим работы 16-битного контроллера TFT и процедуры инициализации режима SPI.
Также присутствуют опции :
- Custom TFT communication routines - Проверьте это, если используются пользовательские процедуры связи TFT. Эти подпрограммы определены на вкладке Set Active.
- One Pixel Space Width - Устанавливает символ пробела для ширины в один пиксель.
Тип контроллера сенсорной панели
Пользователь может выбрать тип контроллера сенсорной панели по умолчанию, расположенный на платах микроэлектроники, тип контроллера сенсорной панели STMPE610, расположенный на платах mikroMedia Plus, контроллер сенсорной панели FT8xx и контроллер сенсорной панели TSC2006.
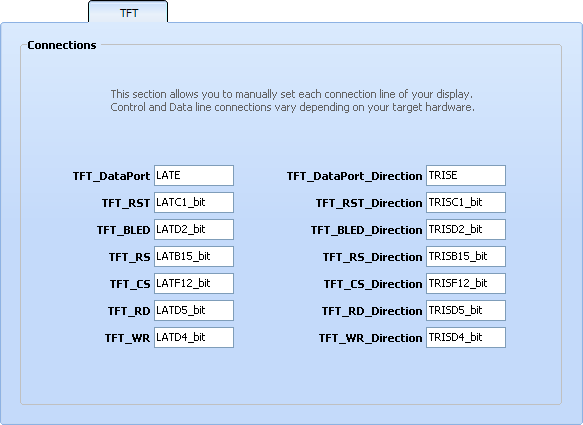
TFT
Эта вкладка используется для настройки и настройки соединений TFT и может иметь различные поля ввода в зависимости от выбранного контроллера TFT:
Himax, Solomon Systech, Renesas SP, Sitronix, Ilitek
Настройте соединения модуля TFT, введя следующую информацию:
FT8xx
Настройте соединения модуля FT8xx, введя следующую информацию:
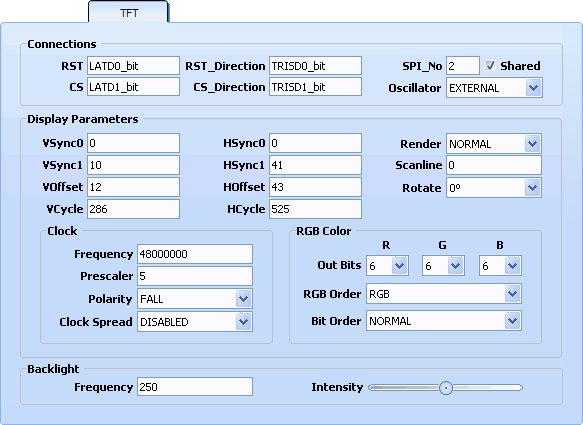
Чтобы настроить соединения FT8xx, введите необходимые данные:

- RST : FT800 Reset Pin.
- CS : FT800 Chip Select Pin.
- RST_Direction : FT800 Reset Pin Direction.
- CS_Direction : FT800 Chip Select Pin Direction.
- SPI_No : Выберите модуль SPI.
- Shared : Установите этот флажок, чтобы делить линии SPI с внешней памятью.
- Oscillator : Выберите внутренний или внешний генератор.
Для настройки параметров дисплея FT8xx введите необходимые данные:

- VSync0 : Vertical sync fall offset.
- Vsync1 : Vertical sync rise offset.
- VOffset : Vertical display start offset.
- VCycle : Vertical total cycle count.
- HSync0 : Horizontal sync fall offset.
- Hsync1 : Horizontal sync rise offset.
- HOffset : Horizontal display start offset.
- HCycle : Horizontal total cycle count.
- Render : Rendering mode, normal or single-line.
- Scanline : Scanline selection.
- Rotate : Rotate screen by 0 or 180 degrees.
Чтобы настроить часы FT8xx, введите необходимые данные:
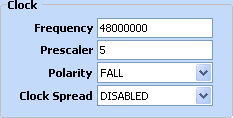
- Frequency : Clock frequency.
- Prescaler : Clock prescaler.
- Polarity : Clock polarity.
- Clock Spread : Clock spreading.
Для настройки цвета FT8xx RGB введите необходимые данные:
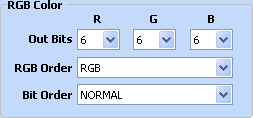
- Out Bits : Bit width of each of the color channels.
- RGB Order : Order of the color channels.
- Bit Order : Normal or reverse bit order of the color channels.
Чтобы настроить параметры подсветки FT8xx, введите необходимые данные:

- Frequency : Backlight frequency.
- Intensity : Backlight intensity.
TIVA
Сконфигурируйте модуль TIVA, введя следующую информацию:
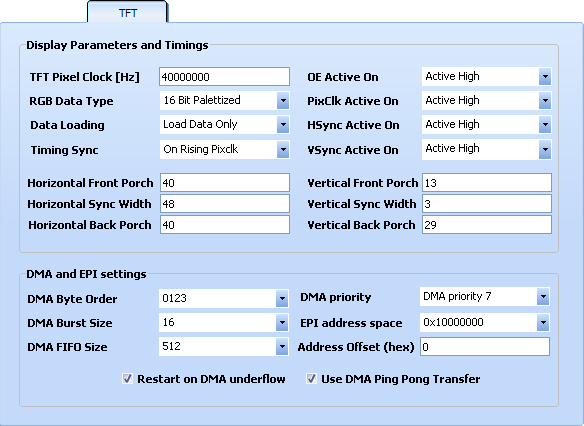
Чтобы настроить параметры и настройки дисплея TIVA, введите необходимые данные:
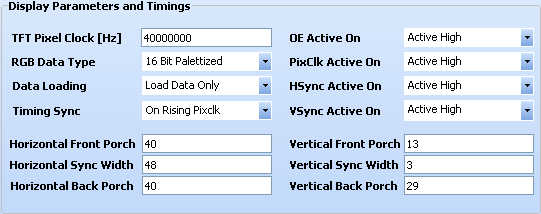
- TFT Pixel Clock : The pixel clock used by the TFT display to clock the pixel data into the line shift register.
- RGB Data Type : Type of RGB Data (12-bit, 16-bit, 24-bit...).
- Data Loading : Select wheter the data, palette or data and palette data are loaded.
- Timing Sync : Select pixel clock synchronization source.
- OE Active On : Output enable signal active level.
- PixClk Active On : Pixel clock signal active level.
- HSync Active On : Horizontal clock active level.
- VSync Active On : Vertical clock active level.
- Horizontal Front Porch : Number of pixel clock periods to add to the end of a line transmission before line clock is asserted (programmed value plus 1).
- Horizontal Back Porch : Number of pixel clock periods to add to the beginning of a line transmission before the first set of pixels is output to the display (programmed value plus 1).
- Horizontal Sync Width : Number of pixel clock periods to pulse the line clock at the end of each line (programmed value plus 1).
- Vertical Front Porch : Number of line clock periods to add to the end of each frame.
- Vertical Back Porch : Number of line clock periods to add to the beginning of a frame before the first set of pixels is output to the display.
- Vertical Sync Width :
- Active mode - it is used to specify the number of line clock periods to set the lcd_fp pin active at the end of each frame after the Vertical Front Porch period elapses.
- Passive mode - it is used to specify the number of extra line clock periods to insert after the Vertical Front Porch period has elapsed.
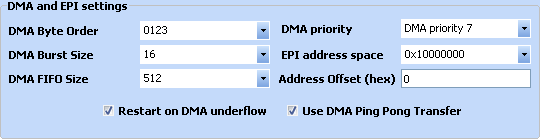
Для настройки параметров DMA и EPI введите необходимые данные:
Set Active
This tab is used to set the custom TFT communication routines, Set_Index, Write_Command, Write_Data and an auxiliary routine which will be used during custom TFT initialization :
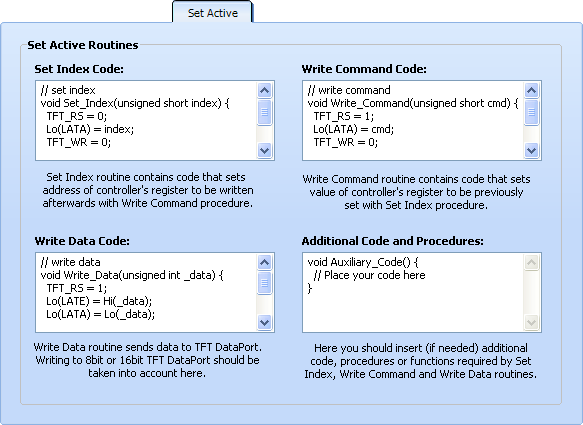
This tab will be available when the Custom TFT communication routines option from the General tab is checked.
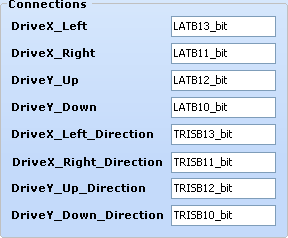
Touch Panel
This tab is used to configure the touch panel connections and settings and can have various input fields depending on the selected touch panel controller :
Default mikroElektronika Touch Panel Controller
For default mikroElektronika Touch Panel Controller, this tab is consisted of the following :
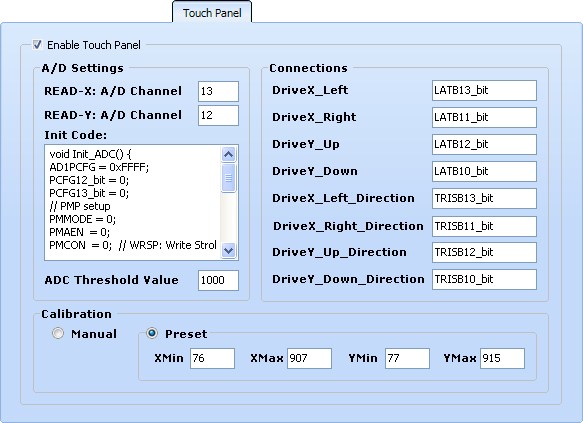
To configure the ADC module, input the required data :
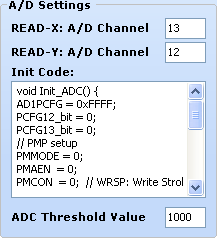
- READ-X : AD channel No : ADC input channel for X-axis.
- READ-Y : AD channel No : ADC input channel for Y-axis.
- Init Code : ADC initialization code.
- ADC Threshold Value : : Threshold value for ADC.
Upon the data input, the text box will be populated with the appropriate code.
Connections :To configure the Touch Panel Module Connections, input the required data :
Calibration can be performed manually, i.e. each time the code is executed or automatically with the predefined constants :

Set the Touch Sensitive Area by entering the coorinate values XMin, XMax, YMin and YMax.
For calibrating touch panel each time after reset choose Manual calibration in Settings Window (F12). If you want to avoid calibration at the start of the program choose Preset and set the values of these constants.
STMPE610 Touch Panel Controller
For STMPE610 Touch Panel Controller, this tab is consisted of the following :
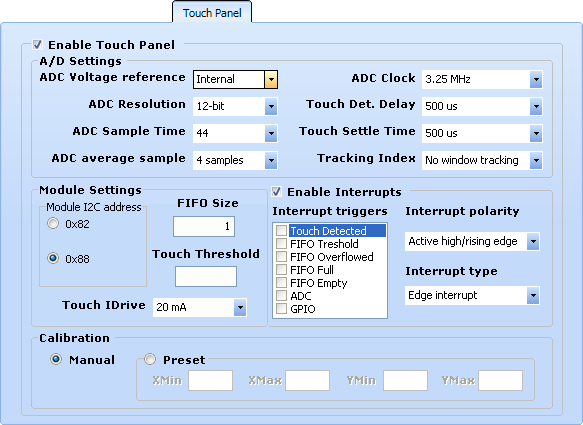
To configure the STMPE610 ADC, input the required data :
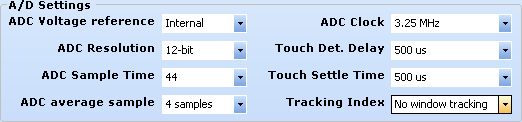
- ADC Voltage Reference : Select ADC Voltage reference
- ADC Resolution : Choose ADC Resolution.
- ADC Sample Time : Time used to read each ADC sample.
- ADC Average Sample : Number of samples used for the coordinate calculation.
- ADC Clock : Clock used for ADC reading.
- Touch Detection Delay : Touch Detect delay is used to compensate for the time it takes for the panel voltage to be pulled high during a non-touch condition.
- Touch Settle Time : Time used for setting the touch activity.
- Tracking Index : Determines the distance between the current touch position and the previous touch position.
To configure the STMPE610 module settings, input the required data :
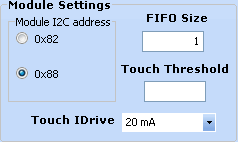
- Module I2C Address : Select module I2C address
- FIFO Size : FIFO buffer used for storing touch data.
- Touch IDrive : Current limit value of the touchscreen drivers.
- Touch Threshold : Sets the touch panel threshold value.
Touchscreen is always set in XYZ mode, in any other mode it will not work properly.
Enable Interrupts :To configure the STMPE610 interrupts, input the required data :
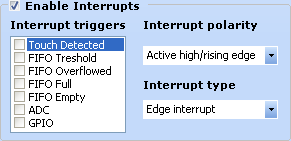
- Enable Interrupts : Check/uncheck to enable/disable interrupts.
- Interrupt trigger : Select the desired interrupt trigger.
- Interrupt polarity : Select the desired interrupt polarity.
- Interrupt type : Select the desired interrupt type.
Calibration can be performed manually, i.e. each time the code is executed, or automatically with the predefined constants :
Set the Touch Sensitive Area by entering the coorinate values XMin, XMax, YMin and YMax.
For calibrating touch panel each time after reset choose Manual calibration in Settings Window (F12). If you want to avoid calibration at the start of the program choose Preset and set the values of these constants.
If the user wishes to enter calibration contants, it is advisable that the calibration is performed in the landscape display orientation.
FT8xx Touch Panel Controller
For FT8xx Touch Panel Controller, this tab is consisted of the following :
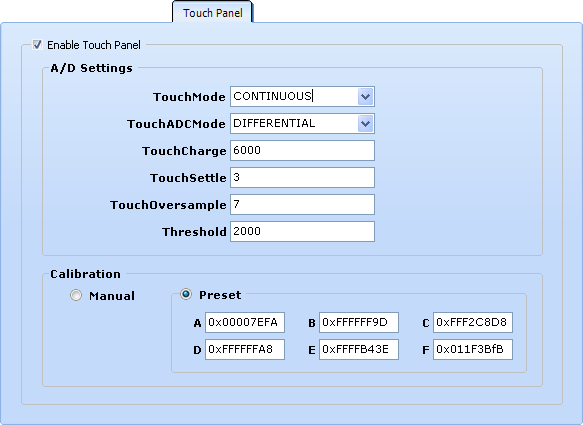
To configure the FT8xx ADC, input the required data :
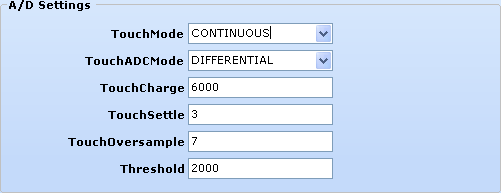
- Touch Mode : Touchscreen sampling mode.
- Touch ADC Mode : Select single ended (low power) or differential (accurate) sampling.
- Touch Charge : Touchscreen charge time, units of 6 clocks.
- Touch Settle : Touchscreen settle time, units of 6 clock.
- Touch Oversample : Touchscreen oversample factor.
- Threshhold : Touchscreen resistance threshold.
Calibration can be performed manually, i.e. each time the code is executed, or automatically with the predefined constants :
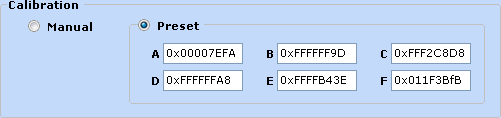
Calibrate the Touch Sensitive Area by entering the transform coefficients - A, B, C, D, E and F.
For calibrating touch panel each time after reset choose Manual calibration in Settings Window (F12). If you want to avoid calibration at the start of the program choose Preset and set the values of these constants.
FT801 and FT810 Touch Panel Controller
For FT801 and FT810 Touch Panel Controller, this tab is consisted of the following :
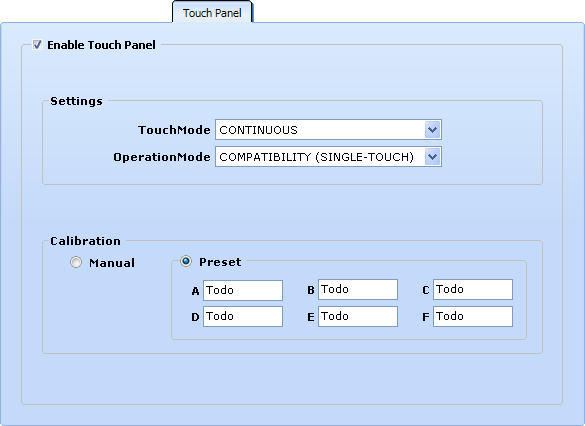
To configure the FT801 and FT810 settings, use the following options :
- Touch Mode : Touchscreen sampling mode - one-shot, continuous or off.
- Operation modee : Touchscreen operation mode - compatibility (single-touch) or extended (multi-touch).
Calibration can be performed manually, i.e. each time the code is executed, or automatically with the predefined constants :
Calibrate the Touch Sensitive Area by entering the transform coefficients - A, B, C, D, E and F.
For calibrating touch panel each time after reset choose Manual calibration in Settings Window (F12). If you want to avoid calibration at the start of the program choose Preset and set the values of these constants.
TSC2006 Touch Panel Controller
For TSC2006 Touch Panel Controller, this tab is consisted of the following :
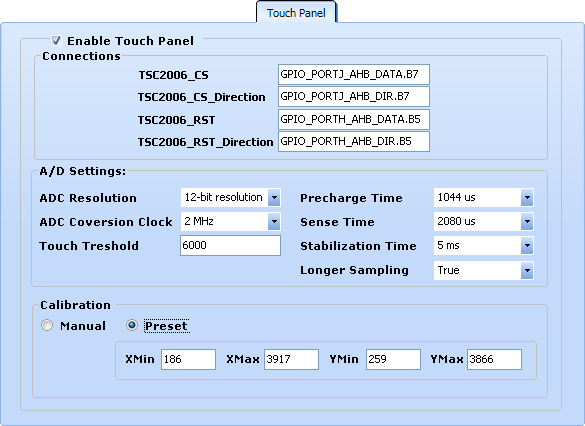
To configure the TSC2006 connections, input the required data :
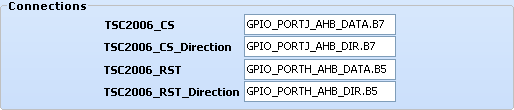
- TSC2006_CS : TSC2006 Chip Select Pin declaration.
- TSC2006_CS_Direction : TSC2006 Chip Select Pin Direction declaration.
- TSC2006_RST : TSC2006 Reset Pin declaration.
- TSC2006_RST_Direction : TSC2006 Reset Pin Direction declaration.
To configure the TSC2006 ADC, input the required data :
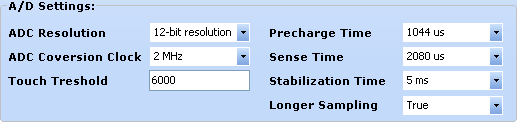
- ADC Resolution : Resolution of the TSC2006 internal ADC module.
- ADC Conversion Clock : Clock rate that the TSC2006 internal ADC module uses to perform conversion.
- Touch Threshold : Touchscreen threshold value.
- Precharge Time : Amount of time allowed for precharging any pin capacitance on the touch screen prior to sensing if a pen touch is happening.
- Sense Time : Amount of time the TSC2006 waits to sense whether the screen is touched after converting a coordinate.
- Stabilization Time : Time delay from the moment the touch screen controller is enabled to the time the voltage is sampled and a conversion is started.
- Longer Sampling : Set to add extra 500ns of sampling time to the normal sampling cycles of each conversion.
Calibration can be performed manually, i.e. each time the code is executed, or automatically with the predefined constants :

Calibrate the Touch Sensitive Area by entering the appropriate coefficients value.
For calibrating touch panel each time after reset choose Manual calibration in Settings Window (F12). If you want to avoid calibration at the start of the program choose Preset and set the values of these constants.
Resources
This tab enables user to choose the location of his resources (images and fonts). User can choose to store them Internally (in the MCU code memory) or to store them Externally in the resource file located on some external media (MMC/SD card, for example).
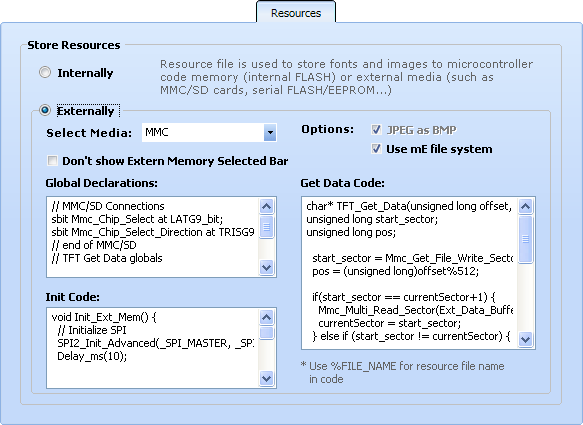
By storing the resources in the external memory, Flash memory consumption is significantly reduced. It is possible to use vast amount of constants, whose size is considerably larger than the size of the MCU Flash memory.
During the code generation process, the resources used are stored in the .RES file located in the project folder.
In order to use them from the external memory, user must transfer this file to this memory.
| Note |
|---|
|
If SD/MMC card is used as an external resource, bear in mind that it has to be properly formatted to FAT16 and empty before transfering the resource file. |
The reading of the resource file from the external memory consists of the following code blocks :
External Memory Global Declarations Block - FAT16
Код mikroC
// MMC/SD Connections
sbit Mmc_Chip_Select at LATG9_bit;
sbit Mmc_Chip_Select_Direction at TRISG9_bit;
// end of MMC/SD Connections

// TFT Get Data globals
char Ext_Data_Buffer[512];
unsigned long currentSector = -1, res_file_size;
// end of TFT Get Data globals
Код mikroPascal
// MMC/SD Connections
var Mmc_Chip_Select : sbit at LATG9_bit;
var Mmc_Chip_Select_Direction : sbit at TRISG9_bit;
// end of MMC/SD Connections

// TFT Get Data globals
var Ext_Data_Buffer : array[512] of byte;
var currentSector : longint;
var res_file_size : dword;
// end of TFT Get Data globals
Код mikroBasic
' MMC/SD Connections
dim Mmc_Chip_Select as sbit at LATG9_bit
dim Mmc_Chip_Select_Direction as sbit at TRISG9_bit
' end of MMC/SD Connections

' TFT Get Data globals
dim Ext_Data_Buffer as byte[512]
dim currentSector as longint
dim res_file_size as longword
' end of TFT Get Data globals
External Memory Global Declarations Block - FAT32
Код mikroC
// Extern memory interface
// MMC/SD Connections
sbit Mmc_Chip_Select_Direction at TRISD2_bit;
sbit Mmc_Chip_Select           at LATD2_bit;
// end of MMC/SD
// VTFT Get Data globals
short rfHandle;
char* rfName;
unsigned long rfStartSect;
// end of VTFT Get Data
// End of extern memory interface
Код mikroPascal
// Extern memory interface
// MMC/SD Connections
var Mmc_Chip_Select_Direction: sbit at TRISD2_bit;
var Mmc_Chip_Select:           sbit at LATD2_bit;
// end of MMC/SD
// VTFT Get Data globals
var rfHandle:    short;
var rfName:      string[14];
var rfStartSect: dword;
// end of VTFT Get Data
// End of extern memory interface
Код mikroBasic
' Extern memory interface
' MMC/SD Connections
dim Mmc_Chip_Select_Direction as sbit at TRISD2_bit
dim Mmc_Chip_Select           as sbit at LATD2_bit
' end of MMC/SD
' VTFT Get Data globals
dim rfHandle    as short
dim rfName      as string[14]
dim rfStartSect as longword
' end of VTFT Get Data
' End of extern memory interface
External Memory Initalization Block - FAT16
Код mikroC
void Init_Ext_Mem() {
// Initialize SPI
SPI2_Init_Advanced(_SPI_MASTER, _SPI_8_BIT, 64, _SPI_SS_DISABLE, _SPI_DATA_SAMPLE_MIDDLE, _SPI_CLK_IDLE_HIGH, _SPI_ACTIVE_2_IDLE);
Delay_ms(10);

// Initialize MMC
if (!Mmc_Fat_Init()) {
  // Reinitialize SPI at higher speed
  SPI2_Init_Advanced(_SPI_MASTER, _SPI_8_BIT, 4, _SPI_SS_DISABLE, _SPI_DATA_SAMPLE_MIDDLE, _SPI_CLK_IDLE_HIGH, _SPI_ACTIVE_2_IDLE);

  // Open resource file for read
  Mmc_Fat_Assign("%FILE_NAME", 0);
  Mmc_Fat_Reset(&res_file_size);
}
}
Код mikroPascal
procedure Init_Ext_Mem();
  begin
currentSector := -1;
// Initialize SPI
SPI2_Init_Advanced(_SPI_MASTER, _SPI_8_BIT, 64, _SPI_SS_DISABLE, _SPI_DATA_SAMPLE_MIDDLE, _SPI_CLK_IDLE_HIGH, _SPI_ACTIVE_2_IDLE);
Delay_ms(10);

// Initialize MMC
if (Mmc_Fat_Init() = 0) then
  begin
    // Reinitialize SPI at higher speed
    SPI2_Init_Advanced(_SPI_MASTER, _SPI_8_BIT, 4, _SPI_SS_DISABLE, _SPI_DATA_SAMPLE_MIDDLE, _SPI_CLK_IDLE_HIGH, _SPI_ACTIVE_2_IDLE);

    // Open resource file for read
    Mmc_Fat_Assign('%FILE_NAME', 0);
    Mmc_Fat_Reset(res_file_size);
  end;
  end;
Код mikroBasic
sub procedure Init_Ext_Mem()
currentSector = -1
' Initialize SPI
SPI2_Init_Advanced(_SPI_MASTER, _SPI_8_BIT, 64, _SPI_SS_DISABLE, _SPI_DATA_SAMPLE_MIDDLE, _SPI_CLK_IDLE_HIGH, _SPI_ACTIVE_2_IDLE)
Delay_ms(10)

' Initialize MMC
if (Mmc_Fat_Init() = 0) then
  ' Reinitialize SPI at higher speed
  SPI2_Init_Advanced(_SPI_MASTER, _SPI_8_BIT, 4, _SPI_SS_DISABLE, _SPI_DATA_SAMPLE_MIDDLE, _SPI_CLK_IDLE_HIGH, _SPI_ACTIVE_2_IDLE)

  ' Open resource file for read
  Mmc_Fat_Assign("%FILE_NAME", 0)
  Mmc_Fat_Reset(res_file_size)
end if
end sub
%FILE_NAME is the resource file name.
External Memory Initalization Block - FAT32
Код mikroC Code
void Init_Ext_Mem() {
  rfHandle    = -1;
  rfName      = "Resource.RES";
  rfStartSect = 0;

  // ensure ft8xx is not selected (because of shared SPI lines)
  // adjust this code to suite hw configuration
  FT800_CS_Direction = 0;
  FT800_CS = 1;

  // Init MMC SPI interface at low speed - 5Mhz
  SPI3_Init_Advanced(_SPI_MASTER,                   // Initialize SPI1 module
                     _SPI_8_BIT,                    // master_mode    = _SPI_MASTER
                     _SPI_PRESCALE_SEC_4,           // data_mode      = _SPI_8_BIT
                     _SPI_PRESCALE_PRI_4,           // sec. prescaler = _SPI_PRESCALE_SEC_1
                     _SPI_SS_DISABLE,               // pri. prescaler = _SPI_PRESCALE_PRI_4
                     _SPI_DATA_SAMPLE_MIDDLE,       // slave_select   = _SPI_SS_DISABLE (Only for slave mod)
                     _SPI_CLK_IDLE_LOW,             // data_sample    = _SPI_DATA_SAMPLE_END
                     _SPI_IDLE_2_ACTIVE);           // clock_idle     = _SPI_CLK_IDLE_HIGH
                                                    // edge           = _SPI_ACTIVE_2_IDLE

  // Init FAT32 stack
  if (!FAT32_Init()) {
    // Reinitialize SPI at higher speed - 20Mhz
    SPI3_Init_Advanced(_SPI_MASTER,                   // Initialize SPI1 module
                       _SPI_8_BIT,                    // master_mode    = _SPI_MASTER
                       _SPI_PRESCALE_SEC_1,           // data_mode      = _SPI_8_BIT
                       _SPI_PRESCALE_PRI_4,           // sec. prescaler = _SPI_PRESCALE_SEC_1
                       _SPI_SS_DISABLE,               // pri. prescaler = _SPI_PRESCALE_PRI_4
                       _SPI_DATA_SAMPLE_MIDDLE,       // slave_select   = _SPI_SS_DISABLE (Only for slave mod)
                       _SPI_CLK_IDLE_LOW,             // data_sample    = _SPI_DATA_SAMPLE_END
                       _SPI_IDLE_2_ACTIVE);           // clock_idle     = _SPI_CLK_IDLE_HIGH
                                                      // edge           = _SPI_ACTIVE_2_IDLE

    // Open resource file for read
    rfHandle    = FAT32_Open(rfName, 0x01);
    rfStartSect = FAT32_ClustToSect(fat32_fdesc[rfHandle]._1stClust);
  }
}
Код mikroPascal
procedure Init_Ext_Mem();
begin
  rfHandle    := -1;
  rfName      := 'Resource.RES';
  rfStartSect := 0;

  // ensure ft8xx is not selected (because of shared SPI lines)
  // adjust this code to suite hw configuration
  FT800_CS_Direction := 0;
  FT800_CS := 1;

  // Init MMC SPI interface at low speed - 5Mhz
  SPI3_Init_Advanced(_SPI_MASTER,                   // Initialize SPI1 module
                     _SPI_8_BIT,                    // master_mode    = _SPI_MASTER
                     _SPI_PRESCALE_SEC_4,           // data_mode      = _SPI_8_BIT
                     _SPI_PRESCALE_PRI_4,           // sec. prescaler = _SPI_PRESCALE_SEC_1
                     _SPI_SS_DISABLE,               // pri. prescaler = _SPI_PRESCALE_PRI_4
                     _SPI_DATA_SAMPLE_MIDDLE,       // slave_select   = _SPI_SS_DISABLE (Only for slave mod)
                     _SPI_CLK_IDLE_LOW,             // data_sample    = _SPI_DATA_SAMPLE_END
                     _SPI_IDLE_2_ACTIVE);           // clock_idle     = _SPI_CLK_IDLE_HIGH
                                                    // edge           = _SPI_ACTIVE_2_IDLE

  // Init FAT32 stack
  if (FAT32_Init() = 0) then begin
    // Reinitialize SPI at higher speed - 20Mhz
    SPI3_Init_Advanced(_SPI_MASTER,                   // Initialize SPI1 module
                       _SPI_8_BIT,                    // master_mode    = _SPI_MASTER
                       _SPI_PRESCALE_SEC_1,           // data_mode      = _SPI_8_BIT
                       _SPI_PRESCALE_PRI_4,           // sec. prescaler = _SPI_PRESCALE_SEC_1
                       _SPI_SS_DISABLE,               // pri. prescaler = _SPI_PRESCALE_PRI_4
                       _SPI_DATA_SAMPLE_MIDDLE,       // slave_select   = _SPI_SS_DISABLE (Only for slave mod)
                       _SPI_CLK_IDLE_LOW,             // data_sample    = _SPI_DATA_SAMPLE_END
                       _SPI_IDLE_2_ACTIVE);           // clock_idle     = _SPI_CLK_IDLE_HIGH
                                                      // edge           = _SPI_ACTIVE_2_IDLE

    // Open resource file for read
    rfHandle    := FAT32_Open(@rfName, 0x01);
    rfStartSect := FAT32_ClustToSect(fat32_fdesc[rfHandle]._1stClust);
  end;
end;
Код mikroBasic
sub procedure Init_Ext_Mem()
  rfHandle    = -1
  rfName      = "Resource.RES"
  rfStartSect = 0

  ' ensure ft8xx is not selected (because of shared SPI lines)
  ' adjust this code to suite hw configuration
  FT800_CS_Direction = 0
  FT800_CS = 1

  ' Init MMC SPI interface at low speed - 5Mhz
  SPI3_Init_Advanced(_SPI_MASTER,                   ' Initialize SPI1 module
                     _SPI_8_BIT,                    ' master_mode    = _SPI_MASTER
                     _SPI_PRESCALE_SEC_4,           ' data_mode      = _SPI_8_BIT
                     _SPI_PRESCALE_PRI_4,           ' sec. prescaler = _SPI_PRESCALE_SEC_1
                     _SPI_SS_DISABLE,               ' pri. prescaler = _SPI_PRESCALE_PRI_4
                     _SPI_DATA_SAMPLE_MIDDLE,       ' slave_select   = _SPI_SS_DISABLE (Only for slave mod)
                     _SPI_CLK_IDLE_LOW,             ' data_sample    = _SPI_DATA_SAMPLE_END
                     _SPI_IDLE_2_ACTIVE)            ' clock_idle     = _SPI_CLK_IDLE_HIGH
                                                    ' edge           = _SPI_ACTIVE_2_IDLE

  ' Init FAT32 stack
  if (FAT32_Init() = 0) then
    ' Reinitialize SPI at higher speed - 20Mhz
    SPI3_Init_Advanced(_SPI_MASTER,                   ' Initialize SPI1 module
                       _SPI_8_BIT,                    ' master_mode    = _SPI_MASTER
                       _SPI_PRESCALE_SEC_1,           ' data_mode      = _SPI_8_BIT
                       _SPI_PRESCALE_PRI_4,           ' sec. prescaler = _SPI_PRESCALE_SEC_1
                       _SPI_SS_DISABLE,               ' pri. prescaler = _SPI_PRESCALE_PRI_4
                       _SPI_DATA_SAMPLE_MIDDLE,       ' slave_select   = _SPI_SS_DISABLE (Only for slave mod)
                       _SPI_CLK_IDLE_LOW,             ' data_sample    = _SPI_DATA_SAMPLE_END
                       _SPI_IDLE_2_ACTIVE)            ' clock_idle     = _SPI_CLK_IDLE_HIGH
                                                      ' edge           = _SPI_ACTIVE_2_IDLE

    ' Open resource file for read
    rfHandle    = FAT32_Open(@rfName, 0x01)
    rfStartSect = FAT32_ClustToSect(fat32_fdesc[rfHandle]._1stClust)
  end if
end sub
Get Data from the External Memory Block - FAT16
Код mikroC Code
char* TFT_Get_Data(unsigned long offset, unsigned long count, unsigned long *num) {
unsigned long start_sector;
unsigned long pos;

start_sector = Mmc_Get_File_Write_Sector() + offset/512;
pos = (unsigned long)offset%512;

if(start_sector == currentSector+1) {
  Mmc_Multi_Read_Sector(Ext_Data_Buffer);
  currentSector = start_sector;
} else if (start_sector != currentSector) {
    if(currentSector != -1)
  Mmc_Multi_Read_Stop();
  Mmc_Multi_Read_Start(start_sector);
  Mmc_Multi_Read_Sector(Ext_Data_Buffer);
  currentSector = start_sector;
}

if(count>512-pos)
  *num = 512-pos;
else
  *num = count;

return Ext_Data_Buffer+pos;
}
Код mikroPascal
function TFT_Get_Data(offset, count : dword; var num : dword) : ^byte;
var start_sector: dword;
pos : dword;
begin
  start_sector := Mmc_Get_File_Write_Sector() + offset div 512;
  pos := dword(offset) mod 512;

  if(start_sector = currentSector+1) then
    begin
      Mmc_Multi_Read_Sector(Ext_Data_Buffer);
      currentSector := start_sector;
    end
  else if(start_sector <> currentSector) then
    begin
      if(currentSector <> -1) then
        Mmc_Multi_Read_Stop();
      Mmc_Multi_Read_Start(start_sector);
      Mmc_Multi_Read_Sector(Ext_Data_Buffer);
      currentSector := start_sector;
    end;

  if(count>512-pos) then
    num := 512-pos
  else
    num := count;

  result := @Ext_Data_Buffer+pos;
end;
Код mikroBasic
sub function TFT_Get_Data(dim offset as longword, dim count as longword, dim byref num as longword) as ^byte
dim start_sector as longword
dim pos as longword
  start_sector = Mmc_Get_File_Write_Sector() + offset div 512
  pos = longword(offset) mod 512

  if(start_sector = currentSector+1) then
    Mmc_Multi_Read_Sector(Ext_Data_Buffer)
    currentSector = start_sector
  else if(start_sector <> currentSector) then
    if(currentSector <> -1) then
      Mmc_Multi_Read_Stop()
    end if
    Mmc_Multi_Read_Start(start_sector)
    Mmc_Multi_Read_Sector(Ext_Data_Buffer)
    currentSector = start_sector
  end if
  end if

  if(count>512-pos) then
    num = 512-pos
  else
    num = count
  end if

  result = @Ext_Data_Buffer+pos
end sub
Get Data from the External Memory Block - FAT32
Код mikroC
char *VTFT_GetExtData(unsigned long fPos, unsigned long bytesToGet, unsigned long *pBytesGot) {
  unsigned int  scOffset;

  *pBytesGot = 0;

  if (rfHandle < 0) {
    return 0; // return with nil if handle was bad.
  }

  // We will utilize some of the fat32 implied features
  // (such as built in sector buffer) to reduce ram memory consumpiton.
  // You can't use this approach if this buffer is going to be used
  // from another thread (i.e. using fat32 routines in interrupt...)
  // In that case or if you have plenty of ram memory use separate
  // as large as possible data buffer.
  f32_sector.fSectNum = rfStartSect + fPos / 512;
  Mmc_Read_Sector(f32_sector.fSectNum, f32_sector.fSect);

  // 512 bytes sector buffer implied.
  scOffset = fPos % 512;
  if(bytesToGet > 512-scOffset)
    *pBytesGot = 512-scOffset;
  else
    *pBytesGot = bytesToGet;

  return &f32_sector.fSect + scOffset;
}
Код mikroPascal Code
function VTFT_GetExtData(fPos : dword; bytesToGet : dword; pBytesGot : ^dword): ^byte;
  var  scOffset : word;
begin
  pBytesGot^ := 0;

  if (rfHandle < 0) then begin
    result := 0; // return with nil if handle was bad.
    exit;
  end;

  // We will utilize some of the fat32 implied features
  // (such as built in sector buffer) to reduce ram memory consumpiton.
  // You can't use this approach if this buffer is going to be used
  // from another thread (i.e. using fat32 routines in interrupt...)
  // In that case or if you have plenty of ram memory use separate
  // as large as possible data buffer.
  f32_sector.fSectNum := rfStartSect + fPos div 512;
  Mmc_Read_Sector(f32_sector.fSectNum, f32_sector.fSect);

  // 512 bytes sector buffer implied.
  scOffset := fPos mod 512;
  if(bytesToGet > 512-scOffset) then
    pBytesGot^ := 512-scOffset
  else
    pBytesGot^ := bytesToGet;

  result := @f32_sector.fSect + scOffset;
end;
Код mikroBasic
sub function VTFT_GetExtData(Dim fPos as longword, Dim bytesToGet as longword, Dim pBytesGot as ^longword) as ^byte
  Dim  scOffset as word
       sc as longword
  pBytesGot^ = 0

  if (rfHandle < 0) then
    result = 0 ' return with nil if handle was bad.
    exit
  end if

  ' We will utilize some of the fat32 implied features
  ' (such as built in sector buffer) to reduce ram memory consumpiton.
  ' You can't use this approach if this buffer is going to be used
  ' from another thread (i.e. using fat32 routines in interrupt...)
  ' In that case or if you have plenty of ram memory use separate
  ' as large as possible data buffer.
  sc = rfStartSect + fPos div 512

  Mmc_Read_Sector(sc, f32_sector.fSect)

  ' 512 bytes sector buffer implied.
  scOffset = fPos mod 512
  if(bytesToGet > 512-scOffset) then
    pBytesGot^ = 512-scOffset
  else
    pBytesGot^ = bytesToGet
   end if

  result = @f32_sector.fSect + scOffset
end sub
The generated blocks of code are located in the Driver file.
Besides these, there are three more options available :
- JPEG as BMP : When this option is enabled, the used JPEG files will be automatically converted to BMP file format, as it provides faster displaying speed.
- Use mE file system : When this option is enabled, the generated resource file will contain header with information about images and fonts included in it. If not enabled, resource file will contain only used images and fonts.
- Don't show Extern Memory Selected bar : When this option is enabled, the Resource Panel will disappear.
Resource Panel
Resource Panel bar is displayed when external memory is selected for storing resources used in the project.
On this bar, there is a Find Resource File button for easier navigation to .RES file (and copying the same to the external memory).
